
Easy Way to Hack WPA/WPA2 WiFi Password

Easy Way to Hack WiFi Password
If you are living nearby someones WiFi hotspot and every time your laptop search for connection its showing up but you don't have passwords. Or you just want to steal someones WPA/WPA2 Wi-Fi hotspot key or passwords. Don't worry...
In this tutorial I’ll show How to hack a WPA/WPA2 Wi-Ficonnection through a bootable USB.
Things you should need:
1. A USB pen drive.
2. beini.iso file. [Download it from HERE].
3. UNetbootin software to make your USB drive bootable. [Download for Windows, Linux or Mac]
Some few steps you should to do ( WEP):
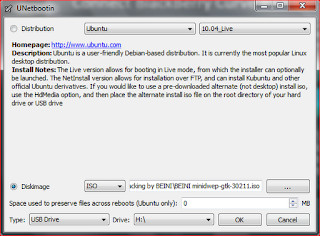
1. Write beini.iso on your USB by UNetbootin. Set everything according to this image bellow.
2. After finishing restart your PC and boot it from your USB.
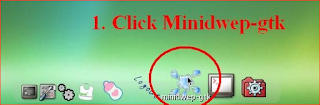
3. If you were successful to boot up then you should see something like this. Click Minidwep-gtk.
4. Click OK.

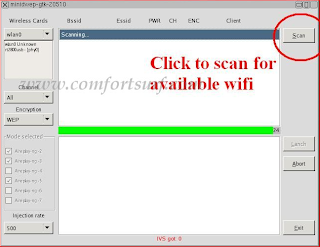
5. Now Minipwep-gtk program will open. Click Scan.
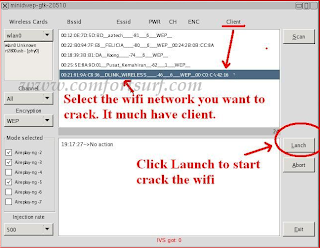
6. Select a wireless network(should have Clint) from the list. And click Lunch to start creaking process.
7. Sometimes its take a while according to your victim connections IVS value and password strength. So keep passions
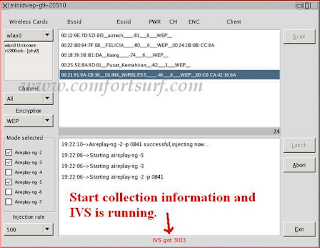
8. If it found a password, it should appear like this.
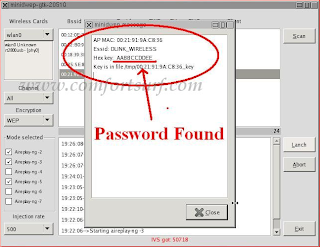
To creak WPA/WPA2 follow this image instruction.

Let me know if you have done it successfully or you have any complicity.
_____________________________________________________________________
Horizontal menu with sub-tabs in two columns for Blogger
This is a very nice horizontal menu in which its sub-tabs are displayed
in two columns and is also made with CSS, without any scripts.
 The "advantage" so to speak, is that the sub-tabs when arranged in two
columns are not very long, so it will be neat and less space along. You
can see an example here:
The "advantage" so to speak, is that the sub-tabs when arranged in two
columns are not very long, so it will be neat and less space along. You
can see an example here:
You can add or delete as many of the main tabs as you need, just make sure to copy the entire code for the main tab for each additional tab you want:


 STEP 4: The final step is to Save the Template and you are done!
Visit your blog to see a beautiful navigation menu just below header.
If you have any questions or need help, leave a comment below.
Adding A Horizontal Menu With Sub Tabs in Two Columns To Blogger
STEP 1: In Blogger, go to your "Layout" and on the "Page Elements" section.- Click on the "Add a Gadget" link just under your header image
- From the Gadget's List, select "HTML/JavaScript" option.
<div id='menucol'>Customize your main tabs by changing the Tab Titles to whatever you want. Include a URL for each one if you want it to be 'clickable'. If not, you can just put a # sign where it says http://YOUR URL HERE.com
<div id='topwrapper'>
<ul id='top'>
<li><a href='http://YOUR URL HERE.com'>Tab 1 Title Here</a></li>
<li><a href='http://YOUR URL HERE.com'>Tab 2 Title Here</a></li>
<li><a class='submenucol' href='#'>Tab 3 Title Here</a>
<ul>
<li><a href='http://YOUR URL HERE.com'>Sub Tab 3.1</a></li>
<li><a href='http://YOUR URL HERE.com'>Sub Tab 3.2</a></li>
<li><a href='http://YOUR URL HERE.com'>Sub Tab 3.3</a></li>
<li><a href='http://YOUR URL HERE.com'>Sub Tab 3.4</a></li>
<li><a href='http://YOUR URL HERE.com'>Sub Tab 3.5</a></li>
<li><a href='http://YOUR URL HERE.com'>Sub Tab 3.6</a></li>
</ul>
</li>
<li><a class='submenucol' href='#'>Tab 4 Title Here</a>
<ul>
<li><a href='http://YOUR URL HERE.com'>Sub Tab 4.1</a></li>
<li><a href='http://YOUR URL HERE.com'>Sub Tab 4.2</a></li>
<li><a href='http://YOUR URL HERE.com'>Sub Tab 4.3</a></li>
<li><a href='http://YOUR URL HERE.com'>Sub Tab 4.4</a></li>
<li><a href='http://YOUR URL HERE.com'>Sub Tab 4.5</a></li>
<li><a href='http://YOUR URL HERE.com'>Sub Tab 4.6</a></li>
</ul>
</li>
<li><a class='submenucol' href='#'>Tab 5 Title Here</a>
<ul>
<li><a href='http://YOUR URL HERE.com'>Sub Tab 5.1</a></li>
<li><a href='http://YOUR URL HERE.com'>Sub Tab 5.2</a></li>
<li><a href='http://YOUR URL HERE.com'>Sub Tab 5.3</a></li>
<li><a href='http://YOUR URL HERE.com'>Sub Tab 5.4</a></li>
<li><a href='http://YOUR URL HERE.com'>Sub Tab 5.5</a></li>
<li><a href='http://YOUR URL HERE.com'>Sub Tab 5.6</a></li>
<li><a href='http://YOUR URL HERE.com'>Sub Tab 5.7</a></li>
<li><a href='http://YOUR URL HERE.com'>Sub Tab 5.8</a></li>
</ul>
</li>
<li><a href='http://YOUR URL HERE.com'>Tab 6 Title Here</a></li>
</ul>
<br class='clearit'/>
</div>
</div>
You can add or delete as many of the main tabs as you need, just make sure to copy the entire code for the main tab for each additional tab you want:
<li><a href='http://YOUR URL HERE.com'>Tab 7 Title Here</a>STEP 3: Now let's go a step further and add the CSS style in our Template
<ul>
<li><a href='http://YOUR URL HERE.com'>Sub Tab 7.1</a></li>
<li><a href='http://YOUR URL HERE.com'>Sub Tab 7.2</a></li>
<li><a href='http://YOUR URL HERE.com'>Sub Tab 7.3</a></li>
</ul>
</li>
- Go to Template > Edit HTML
- Click on the sideways arrow next to <b:skin>...</b:skin>
- Then click anywhere inside the code area and search - using CTRL + F keys - for the ]]></b:skin> tag and just above ]]></b:skin> add this code:
/* Horizontal menu with 2 columns
----------------------------------------------- */
#menucol {
width:940px;
height:37px;
background-image: -moz-linear-gradient(top, #666666, #000000);
background-image: -webkit-gradient(linear, left top, left bottom, color-stop(0.00, #666666), color-stop(1.0, #000000));
filter: progid:DXImageTransform.Microsoft.Gradient(gradientType=0,startColorStr=#666666,endColorStr=#000000);
border-bottom:1px solid #666666;
border-top:1px solid #666666;
margin:0 auto;padding:0 auto;
overflow:hidden;
}
#topwrapper {
width:940px;
height:40px;
margin:0 auto;
padding:0 auto;
}
.clearit {
clear: both;
height: 0;
line-height: 0.0;
font-size: 0;
}
#top {
width:100%;
}
#top, #top ul {
padding: 0;
margin: 0;
list-style: none;
}
#top a {
border-right:1px solid #333333;
text-align:left;
display: block;
text-decoration: none;
padding:10px 12px 11px;
font:bold 14px Arial;
text-transform:none;
color:#eee;
}
#top a:hover {
background:#000000;
color:#F6F6F6;
}
#top a.submenucol {
background-image: url(https://blogger.googleusercontent.com/img/b/R29vZ2xl/AVvXsEj-GhzHBqtbij5UT2PxOlvS7IiIbhn2l0ST7lGZzBie7cNEiNttCTC9N4Mtm2eqILGH2dcTFOWDmtIDpEO_8ITqWCSwdXihvLjCI49bWN5RGeUzI28RjywLxMwe7j03ZGGITFS5lSQzrm4/s1600/arrow_white.gif);
background-repeat: no-repeat;
padding: 10px 24px 11px 12px;
background-position: right center;
}
#top li {
float: left;
position: relative;
}
#top li {
position: static !important;
width: auto;
}
#top li ul, #top ul li {
width:300px;
}
#top ul li a {
text-align:left;
padding: 6px 15px;
font-size:13px;
font-weight:normal;
text-transform:none;
font-family:Arial, sans-serif;
border:none;
}
#top li ul {
z-index:100;
position: absolute;
display: none;
background-color:#F1F1F1;
margin-left:-80px;
padding:10px 0;
border-radius: 0px 0px 6px 6px;
box-shadow:0 2px 2px rgba(0,0,0,0.6);
filter:alpha(opacity=87);
opacity:.87;
}
#top li ul li {
width:150px;
float:left;
margin:0;
padding:0;
}
#top li:hover ul, #top li.hvr ul {
display: block;
}
#top li:hover ul a, #top li.hvr ul a {
color:#333;
background-color:transparent;
text-decoration:none;
}
#top ul a:hover {
text-decoration:underline!important;
color:#444444 !important;
}
- Now find (CTRL + F) this line:
/* Tabs
- It will also have some little lines beneath:
/* Tabs
----------------------------------------------- */
- And just below these little lines, delete the code below until you reach at:
/* Columns
----------------------------------------------- */
- Instead of the code that you have removed, add this one:
#crosscol ul {z-index: 200; padding:0 !important;}
#crosscol li:hover {position:relative;}
#crosscol ul li {padding:0 !important;}
.tabs-outer {z-index:1;}
.tabs-inner {padding: 0 0px;}
See this screenshot for more info:
Visit your blog to see a beautiful navigation menu just below header.
If you have any questions or need help, leave a comment below.

No comments:
Post a Comment